MyCalyx Administration Functions
User Management
Managing Point® and PointCentral® users is done on the Manage Point Installations page. Only an Administrator is authorized to access this page.
The following functions are performed on the Manage Users page:
- Create installation settings
- Add users
- Import/Export users
- Assign and rescind user roles
- Delete users
- Edit user
- Deploy and re-send the installation link e-mail to end users
- Specify the Point version
The top of the Manage Point Installations page contains a summary of users, the number of installations, the number of licenses for the account, the status of each license, a legend that explains the status codes, and a filter used to search for users. In addition to those already listed, the PointCentral Manage Point Installations page contains the total licensed mobile users.
The bottom of the page contains the number of users, page navigation controls, a dropdown list to specify the number of records to display on a page at a time, and buttons to use to apply roles and installation settings, re-send the installation e-mail, apply the Point version, and delete users. These buttons apply the action to the records with the check mark that precedes the record selected.
Each record contains the user nickname, username (e-mail address), check boxes that are used to assign roles, license status, last activity date, installation group, the version that is licensed by your organization, and whether a new version is pending installation for that license.
By default, the records on the Manage Point Installations page are sorted by the Last Activity column in descending order. To change the sort order of the table, click the column heading.
The license status, indicated by a colored icon, shows the license status of users assigned the End User role.
The icons represent the following status:
| Color |
|
Status |
| Red |
 |
An installation problem has occurred. |
| Yellow |
 |
The seat was assigned and the installation link was clicked. The installation is in progress. |
| Orange |
 |
The e-mail was sent, but the link to initiate the installation was not clicked. |
| Green |
 |
The seat is active and Point is installed and operational. |
| White |
 |
A seat is not assigned. |
Licenses with a status of Active (green), In progress (yellow), and Problem (red) are considered installed and are included in the total.
The following buttons on the Manage Point Installations page provide additional functionality:
- Getting Started - Click the Getting Started button for additional information about using the Manage Users page.
- Installation Settings - Click the Installation Settings button to access the Installation Settings page. Use the Installation Settings page to create installation groups. Installation groups contain preset installation parameters and are assigned to users when they are created and are implemented when the end user installs Point. When the Administrator updates the Point version for an end user, the end user installation is completed per the settings in their assigned installation group.
Using installation settings is optional. The default Point installation in a non-server environment creates the default template and data folders and includes Point Administrator.
- Import Users - The Import Users button imports a list of users from an existing comma-separated value file.
- Add a User - The Add a User button adds an empty row to the list, which is used to add a new user.
- Export Users - The Export Users button exports all data for each user to a Microsoft Excel® document.
- Refresh - Use the Refresh button to refresh the screen after changes and updates are made.
The following buttons below the user list, apply actions to the selected records
(those with the check box selected that precedes the record):
- Apply End User Role - Use the Apply End User Role button to assign each selected user the End User role.
- Resend E-Mail - Use the Resend E-mail button to re-send the installation or Administrator registration e-mail, whichever one is applicable, to the selected users.
- Remove End User Role - Removes only the end user role from the user. If the user is assigned more than one role, other roles remain.
- Delete - Use the Delete button to delete the selected users from MyCalyx®.
- Apply Installation Settings - Use the Apply Installation Settings button to apply an installation group to the selected users. Select the installation group from the dropdown list, then click the button.
- Apply Version - Use the Apply Version button to apply the specified Point version to the selected users. Select the version from the dropdown list, then click the button.
- Purchaser - Use the Apply End User Role button to assign each selected user the End User role.
Adding Users
To add an end user to MyCalyx and assign them a Point license:
- Go to the MyCalyx home page.
- Click Manage Point Installations to access the Manage Point Installations page.
- Click the Add a User button at the top of the page to add a new record above the user list.
- Enter a nickname for the user and enter the user's e-mail address in the Username (Email) field.
Note: You can enter a nickname up to 50 characters long.
If the nickname exceeds the visible width of the field, scroll to the right to view the entire name.
- Select the End User check box to assign the end user role to the new user.
You can assign the Administrator role at this time also.
- Optionally, assign an installation group to the user by selecting an option from the dropdown list.
- Select a version number from the Version dropdown list, or use the Apply Version button to apply the selected version next to the button to all selected users. The Version Pending check box indicates, when checked, that the assigned version for that user was not installed.
- Click the Save icon (
 ) to save the user.
The entry is saved and is added to the user database. An e-mail is automatically generated and is sent to the user.
The e-mail informs them of the roles they were assigned and contains a link to install Point.
Note: For details about the Point installation process, refer to the Point User Guide.
- Click the Cancel icon (
 ) to cancel the add user process.
Important: The link expires 120 hours after the e-mail is generated. If the End User does not install Point within the 120-hour period, they must contact their MyCalyx administrator to have them re-send the e-mail.
Attention: If the save is not successful, an error message is displayed and a red asterisk is placed next to the field that contains the error.
- Enter additional users as needed.
Important: You can assign an infinite number of end user roles, regardless of whether you have enough licenses. The users who activate the Point installation before all of the licenses are used have a successful installation. Users who attempt to activate the Point installation after all licenses are installed, receive a message to contact their MyCalyx Administrator.
Adding Administrators
Only an Administrator can add users and additional Administrators to MyCalyx. The Initial MyCalyx Administrator is created when Calyx creates the customer account. It is not possible to delete the Initial Administrator. The Initial Administrator is indicated in gray type on the Manage Point Installations page.
Attention: To change the Initial Administrator for your account, contact Calyx Software Support at 800-342-2599 (toll free).
To add an Administrator to MyCalyx:
- Go to the MyCalyx home page.
- Click Manage Point Installations to access the Manage Point Installations page.
- Click the Add a User button at the top of the page to add a new record above the user list.
- Enter a nickname for the user and enter the user's e-mail address in the Username (Email) field.
Note: You can enter a nickname up to 50 characters long. If the nickname exceeds the visible width of the field, you can scroll to view the entire name.
- Select the Administrator check box to assign the Administrator role to the user. If the Administrator is also an end-user, select the End User check box and assign an installation group, if using.
- Click the Save icon ( ) to save the user.
– The entry is saved and added to the user database. An e-mail is automatically generated and is sent to the user.
The e-mail informs them of the roles they were assigned and in the case of an Administrator, a link to the MyCalyx registration page where they must register before they can access MyCalyx.
– The entry is saved and added to the user database.
An e-mail is automatically generated and is sent to the user which informs them of the roles they were assigned and in the case of an Administrator, a link to the MyCalyx registration page where they must register before they can access MyCalyx.
- Click the Cancel icon ( ) to cancel the add user process.
Important: The administrator link expires 120 hours after the e-mail is generated. If the Administrator does not register within the 120-hour period, they must contact their MyCalyx administrator to have them re-send the e-mail.
Attention: If the save is not successful, an error message is displayed and a red asterisk is placed next to the field that contains the error.
Registering as an Administrator
When a user is assigned the role of Administrator, they will receive an e-mail notification that contains a link to register in MyCalyx.
To register as an Administrator:
- Open the MyCalyx e-mail.
– The e-mail contains a link to register and a link to a video demo about the Administrator role and functions in MyCalyx.
– The video is also accessible from the MyCalyx Help page for future access.
- View the video.
- After viewing the video, click the Register link.
- Enter your first name, last name, and password.
- Select the check box to acknowledge that you understand and accept the MyCalyx terms of use.
- Click Submit.
Important: The link expires 120 hours after the e-mail is generated. If the Administrator does not register in MyCalyx within the 120-hour period, the administrator who created the e-mail must resend the e-mail.
Adding Users by Importing From a (.csv) File
You can import a list of users from a comma-separated value file (.csv) into MyCalyx.
Requirement: The file that contains the users to import must be in .csv format for the import to be successful.
To import users into MyCalyx:
- Go to the MyCalyx home page.
- Click Manage Point Installations to access the Manage Point Installations page.
- Click the Import Users button to access the Import Users page.
- Click the Browse button to open a file upload dialog box and navigate to the location of the .csv file that contains the user list.
- Select the file and click Import Users from File to initiate the import process.
– During the import process each user record is validated to insure it is in the proper format. If all of the records are valid, they are added to the user list in the same sequence as in the .csv file. If any record in the file is invalid, it is ignored and the import continues.
You cannot import a username (e-mail) that already exists in MyCalyx.
– A message is displayed that indicates whether the import was successful.
- After the import is successful, assign user roles and specify each user's installation group.
Creating a Comma-Separated Value File
Create a comma-separated value (.csv) file to import a large number of users into MyCalyx.
To create a comma-separated value file:
- Open a new Microsoft Excel® file.
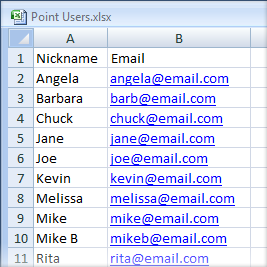
- Enter headers for each column. For example:
– Enter Nickname in the first cell in the first row (A1).
– Enter Email in the second cell in the first row (B1).
- Enter each user's nickname and e-mail address in the respective column,
as shown in the example (right).
- When you are finished entering users in the spreadsheet, select File > Save As.
- Enter a file name, select CSV from the Save as type dropdown list, and click Save.
|
 |
Exporting Users
Use the export function to export the list of MyCalyx users and their settings to a Microsoft Excel® file.
- Go to the MyCalyx home page.
- Click Manage Point Installations to access the Manage Point Installations page.
- Click the Export Users button to open a Windows Save As dialog box.
- Enter a file name in the File name field.
The only file type available is Excel 97-2003 Workbook (*.xls) and is pre-selected in Save as type dropdown list.
- Click Save.
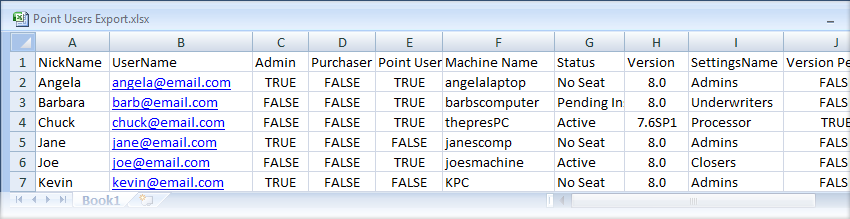
All data for each record is exported to an Excel file. An example is shown in the following figure:
Modifying User Properties
To modify user properties:
- Go to the MyCalyx home page.
- Click Manage Point Installations to access the Manage Point Installations page.
- To change user properties for individual users, select the user to update by double-clicking the user row to enable the fields.
The record becomes enabled for editing.
- Edit the username, nickname, roles, installation group, or version and click Save.
- To change properties for multiple users, select the check boxes that correspond to the users you want to change. To change the properties for all of the users that are currently displayed, select the check box at the top of the list to select all users.
Use the buttons at the bottom of the screen to apply the end user role, installation settings, and Point version and to resend the e-mail or delete the user.
Tip: Use the filter to view users with specific properties if your organization has a large number of users.
- Click Save.
The entry is saved and added to the user database. When a role is added or a user name is updated, an e-mail is automatically generated and is sent to the user informing them that their user properties were modified. An e-mail notification is not sent in the following situations:
– When an existing role is removed and no other roles remain.
– When only the installation group is changed.
– When only the version is changed.
Important: If more than one Administrator is editing the same record at the same time, the changes are retained in the sequence that they are saved. Therefore, changes made to the same information could be lost if another Administrator is editing the same information.
From initial application through trailing documents – including secondary marketing, Calyx has you covered.
Call 800-362-2599 for pricing options or to schedule a live demonstration.











 MyCalyx Overview